Microsoft Intern Interview Question #3: Flood Fill Detection
Question #3 was way too hard for me at the time, but it is a great example of a binary puzzle, and clever use of SIMD before there were SIMD instructions on desktop computers.
There are no Performance-Aware Programming lessons this week because it is Summer Internship 1994 Week here on Computer, Enhance! This week will feature five posts about the programming questions I was asked when I interviewed for a Microsoft summer internship way, way back in 1994. Normally scheduled lessons will resume next week.
Question number three from my 1994 Microsoft internship interview was actually the most interesting question of the four. It wasn't the hardest — it’s easier than question four — but it's more interesting, and almost seems prescient in retrospect. Even though SIMD instructions did not exist on desktop computers of that era, programmers were already finding ways to operate on multiple pieces of data with single instructions by being clever about how they arranged the bits.
This question was way too hard for me at the time. I knew how binary operators worked, but I had no experience solving binary logic “puzzles”. I don’t think I’d ever been posed one before this interview. I had no idea how to approach the question. I did eventually “get it right” on the whiteboard, but only because the interviewer helped me out a lot.
The background for this question is the “flood fill” operation present in most contemporary graphics libraries of the era. This operation takes a 2D buffer of some kind, usually representing an image, and allows the programmer to select a fill color and starting point. The flood fill then starts at the point, reads its color, and proceeds to change the color of that point — and any neighboring points with the same color — to the fill color. This process repeats ad infinitum until all connected points with the same color have been “filled” to the new color. If you’ve ever used the “paint bucket” fill in Photoshop, it’s basically that operation.
Typically, this was used so that the programmer could draw some kind of outline using other graphics library calls, then fill in the resulting shape by “flooding” the interior. It was quite slow on computers of that era — you could literally watch it paint — but it was a very common operation.
This particular interviewer had apparently been involved in the optimization of Microsoft’s own flood fill implementation, which I assume was for one of their BASIC packages. The flood fill was written for 4-color CGA mode, a mode in which each pixel could only be one of four preset colors.
Obviously, four colors only requires two bits to represent each pixel. But the smallest operable value on x86 machines was an 8-bit byte. This meant that each byte of memory for a 4-color CGA image actually held four pixels. The pixels were packed together into a byte, two bits per pixel:
In optimizing the flood fill, the Microsoft programmers had found that the key step in the process was checking to see if a given byte — representing four pixels — contained the search color for the flood fill. This color was, of course, constant throughout the entire operation, because it is determined once at the beginning by the starting pixel.
The interview question was to derive the fastest way to take a four-pixel byte and return true (non-zero) if it contained the search color, or false (zero) if it did not. For example, if the search color was 3 (0b11), then 0b11100100 should return true, because pixel 3 is that color, but 0b00101001 should return false because no pixel has that color:
Crucially, you must also ensure that two bits that straddle a pixel boundary do not match. 0b01100000, for example, has the pattern 0b11 in it, but it should not return true, because it only exists between pixels two and three. It is not itself a pixel in the byte.
In function form, the goal is to write this:
int ContainsColor(char unsigned Pixels, char unsigned Color)
{
    /* Fill in the computation of true (non-zero) or false (zero) here */
}
As an added benefit, the “Color” parameter here could be prepared however you like — so any precomputation you wanted to do with the input color could be done once and then reused for this “function” (which would not have been an actual function, it would have just be welded into the overall algorithm, of course).
There is an obvious way to write this, if you don’t know better: just write the code to test each pixel individually. That would look something like this:
if((Pixel & 3) == Color) return 1;
if(((Pixel >> 2) & 3) == Color) return 1;
if(((Pixel >> 4) & 3) == Color) return 1;
if(((Pixel >> 6) & 3) == Color) return 1;
return 0;
This version just shifts-and-masks each pixel into its own stand-alone value, then uses the normal equals predicate to test for a match.
I believe I wrote something terrible like that on the board. It works, of course, as does the less-terrible version which just OR’s the results together instead of branching:
return ((Pixel & 3) == Color) |
       (((Pixel >> 2) & 3) == Color) |
       (((Pixel >> 4) & 3) == Color) |
       (((Pixel >> 6) & 3) == Color);
I doubt I wrote that version, because I don’t think the idea of OR’ing together boolean ops to produce a result had really occurred to me at that point.
But regardless, even the less-terrible version has four compares, four ANDs, three shifts, and three OR’s. As the interviewer quickly prodded me after I wrote something like these on the whiteboard, couldn’t we do better?
The answer for me at the time was definitely “no”. Without the interviewer’s help, I would not have been able to do anything more. Thankfully, the interviewer pushed me a bit and prompted me toward the correct solution, and when I finally “got it”, it was incredibly satisfying. Honestly, it probably started me down the path of binary puzzle solving — had I not been walked through this solution, I don’t know how long it would have been before I discovered this style of programming elsewhere! I simply didn’t have exposure to these sorts of techniques, so it was a great learning experience for me. Once you’re shown one technique like this, you can quickly figure out lots more yourself1.
The key to solving this problem efficiently on the CPUs of that era was to recognize that XOR is actually just “not equal to” (!=) in binary. I don’t think I’d ever really internalized that, even though I knew what XOR did. You might say I understood XOR mechanically, but not semantically.
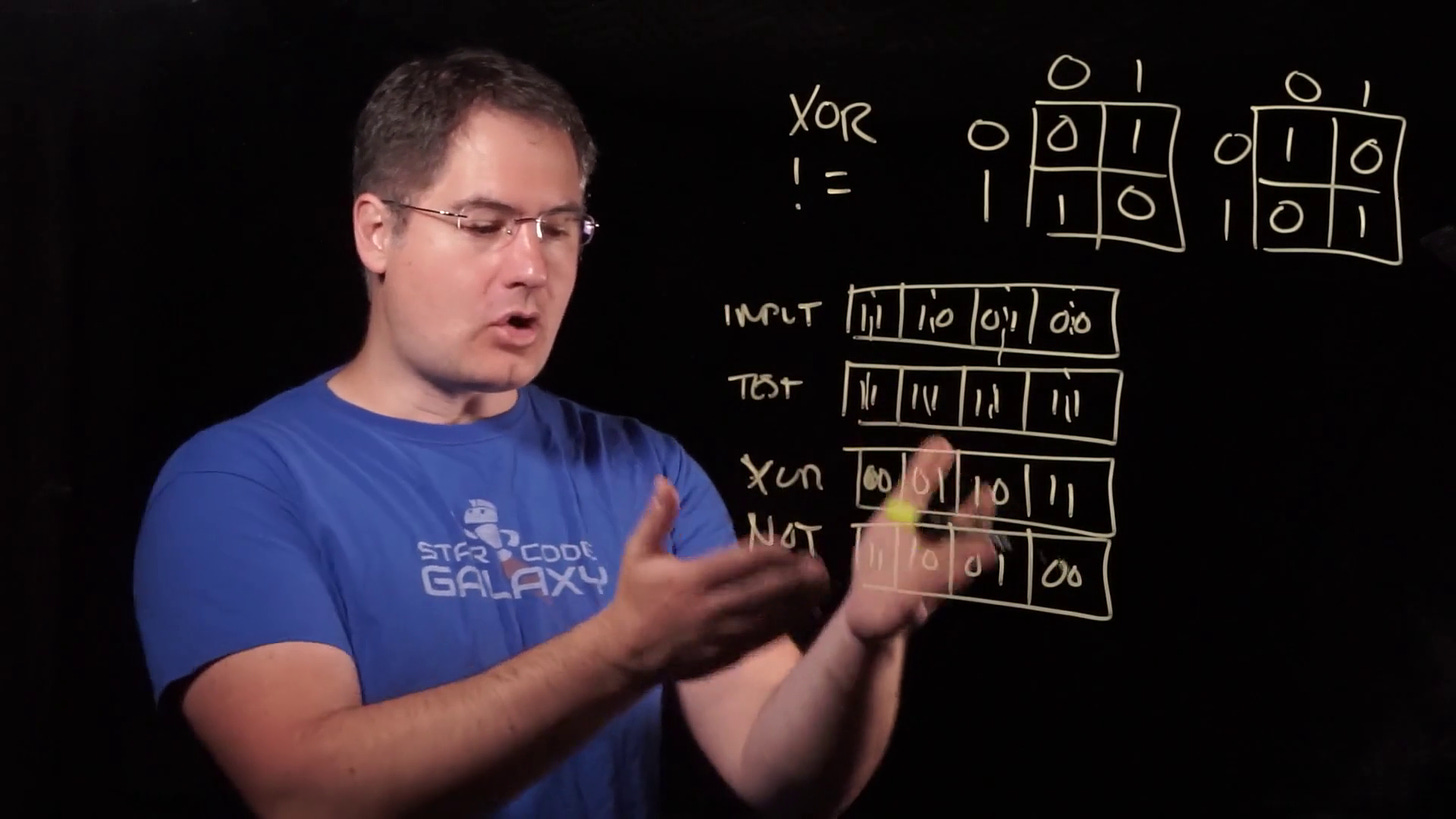
If you look at the result of an XOR, and compare it to the result of a hypothetical “bitwise equal-to comparison”, you can trivially see they are opposites of each other:
XOR, on the left, is 1 whenever the input bits are different. “Equal to”, on the right, is 1 whenever the input bits are the same. This means XOR is effectively a bitwise != operator.
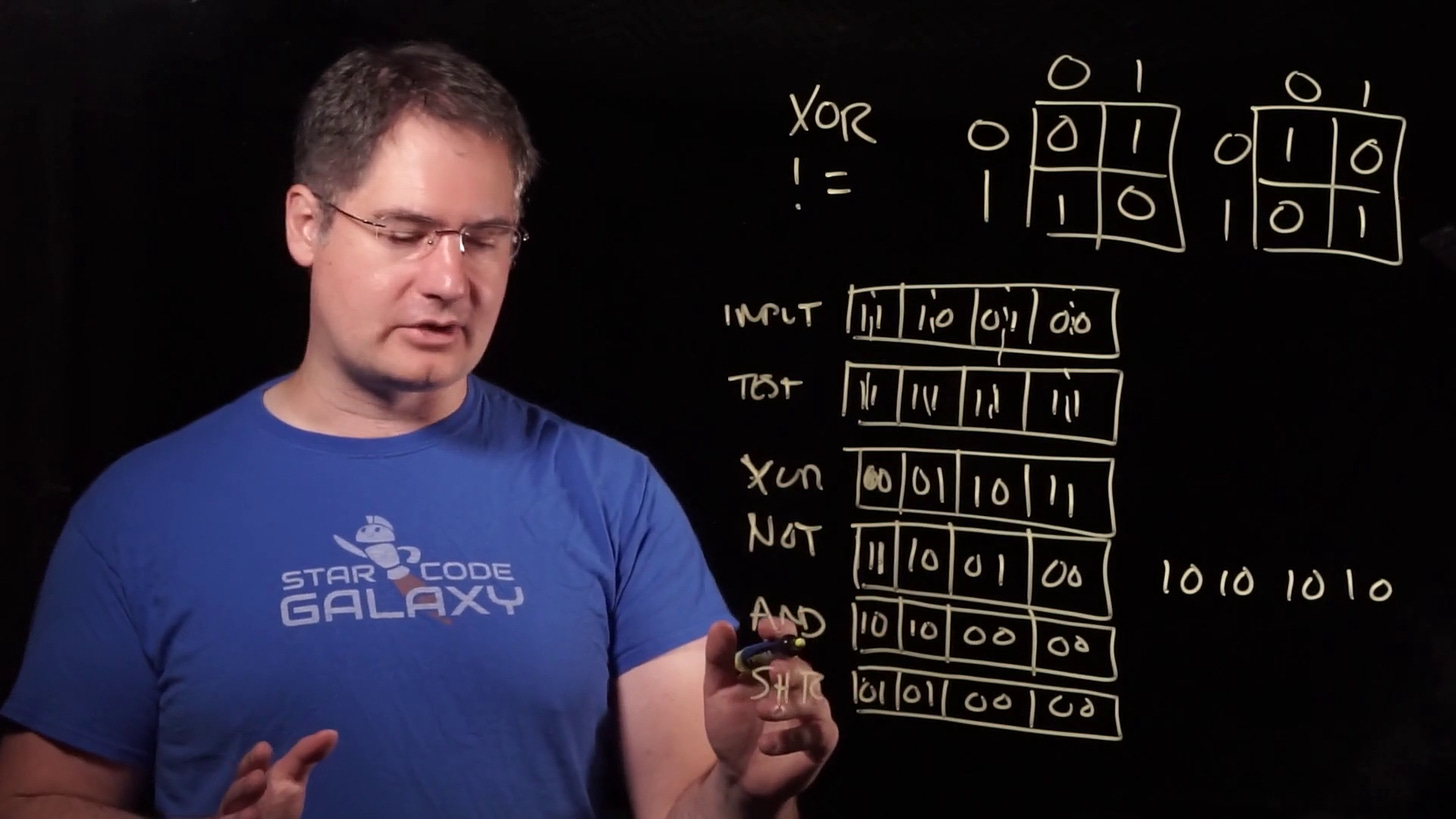
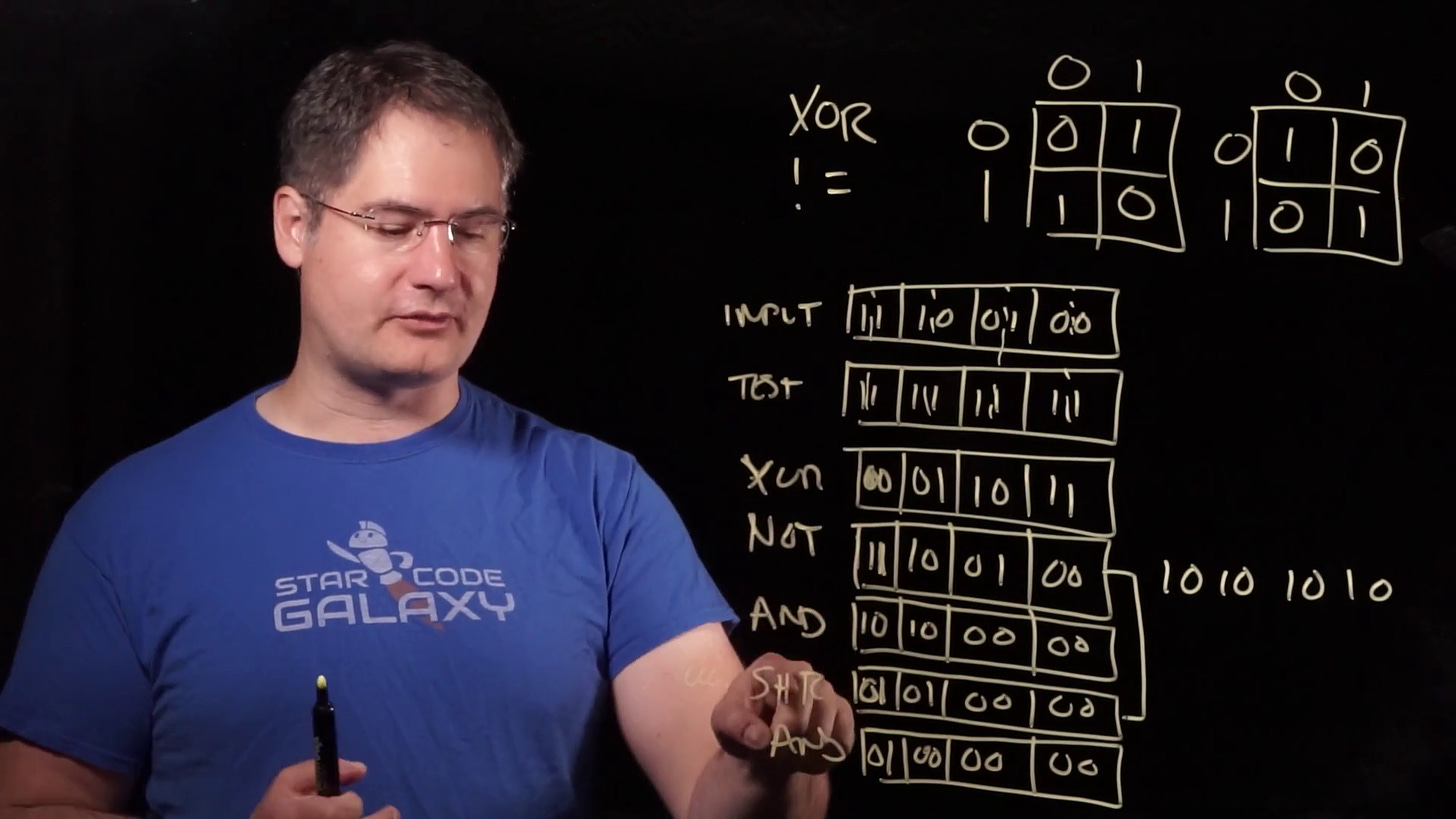
With this realization, we can immediately see how we can start our byte check. If we pre-replicate our “Color” input so that it has the search color in every pixel, we can do a “XOR NOT” with the input byte to immediately see which bits are equal between the two:
If this were a one bit-per-pixel mode, we would be finished! We have a resulting byte now which has 1’s wherever the values matched. But of course, we’re not done yet, because this is a two bit-per-pixel mode, so we still need some way of ensuring that both bits matched for at least one of the pixels.
What we need is a way of lining up the two bits in each pixel so that we can check if they were both 1. Checking if two values are 1 is easy, of course — that is what AND does. So all we need to do is make sure that the two bits from each pixel end up in the same column somehow.
Fortunately, that is also a very easy operation on the CPUs of that era. They all had “logical right shift”, the operation which moves bits to the right while filling the missing leftmost bits with 0’s. A right shift of one bit will move the high bit of each pixel in line with the low bit, so then could be ANDed together.
But, there’s a catch. Because the shift will operate on the entire byte, the low bit from each pixel will also shift into the neighboring pixel. We definitely don’t want this, because it could make our AND produce erroneous 1’s.
Again, there’s an easy fix. If we mask the value with an AND before shifting it, we can remove all the low bits first. Then, our shifted value will be guaranteed to only have the high bits, shifted to the right so they align with the low bits:
Again, this is very simple to perform on CPUs of that era. We simply load a mask of 0b10101010 beforehand, so it is always available, and we AND with that before shifting.
All that’s left is to AND our mask-shifted value with the original XOR NOT result. This yields 1’s in the low bit of any pixel where both bits matched exactly, and 0’s everywhere else.
And that’s our answer:
The final code is extremely simple. If you’d like to watch it work yourself, you can try compiling this program and stepping through it in the debugger:
#include <stdio.h>

int main(void)
{
        char unsigned Pixels = 0b11000111;
        char unsigned Color = 0b00000000;
        char unsigned Mask = 0b10101010;

        char unsigned Eq = ~(Pixels ^ Color);
        char unsigned Result = Eq & ((Eq & Mask) >> 1);

        printf("Result: %u\n", Result);

        return 0;
}
You can set Pixels to whatever you want, and Color to any 4x replicated 2-bit value. The printed Result will then be non-zero if the 2-bit value appears in a sub-pixel of Pixels, and zero otherwise.
As you can see, the expression is now very simple, and involves far fewer operations than the naïve solution: one XOR, one NOT, two ANDs and one shift!
I really loved this whole question. It was my favorite of the four by far. As I've said before in multiple places, I don't think the “solve a programming puzzle on a whiteboard” is a good way to interview people. I don't do interviews this way and I don't think it's a good process. But if you put that aside and just think of it as something that was fun for me to do as a teenager who didn’t know very much about programming, separate from whether it made a good interview, it was great! It was so educational for me to see.
And if you think about what was actually going on here, bringing it forward to the modern context, this is really “SIMD without SIMD instructions”. SIMD stands for “single instruction, multiple data”, and that’s exactly what this algorithm does: it operates on multiple pieces of data — the pixels — using single instructions. Some people seem to refer to this as “SWAR” — “SIMD within a register” — but I’d actually never heard that term used to describe this kind of algorithm until very recently.
You can also see evidence in this algorithm of why SIMD-specific instructions are useful. We had to mask our value before shifting, because the processor did not know that our data was arranged in 2-bit lanes. If the processor had known that each 2-bit lane of the byte was its own separate value, then it could isolate those when doing operations like shift so that shifts never move bits between lanes. This would get rid of the need to mask first.
And that’s exactly how modern SIMD shifts work, in fact. When you do a shift on a SIMD instruction set, you tell it not only how many bits you want to shift by, but also how wide the lanes are. You typically get a choice of 8, 16, 32, or 64 bits per lane. This helps make everything more efficient, because all the instructions that would have been necessary to prevent lane-crossing are now unnecessary.
What’s more, since even things like comparisons have been extended to SIMD now, we no longer have to resort to things like this algorithm to compare packed data anymore. Since SIMD instruction sets can automatically do comparisons on various lane sizes, we often only need one instruction to do the entire operation that required XOR, NOT, AND, SHIFT, AND in the pre-SIMD case.
That said, you might still need this algorithm if you wanted to work on 2-bit pixels, because the lanes don’t go any smaller than 8-bits on modern instruction sets! Thankfully, we typically have the memory these days for larger pixel sizes, so this rarely tends to be an issue.
So that's it for question three. The basic idea behind the answer is still very relevant to programming today. SIMD algorithms are the kind of thing that we think about a lot nowadays, because most modern processors operate several times faster when programmed with SIMD in mind than if they are forced to work on single pieces of data. Most processors now want to operate on at least 256 bits of data at a time, and some even more than that! So every programmer would benefit from learning how to think in terms of SIMD, even if it’s only at a high-level.
If you’re new to SIMD, and would like to learn more about how it works and how to program with, that's exactly what’s coming up next in my Performance-Aware Programming Series right here on Computer Enhance. So if you’re not already taking the course, and you’re interested in learning, you can check out our subscription options right here:
Addendum
I’m 99% sure that the final algorithm as I presented it in this article was the final one from the interview. It is “historically accurate”. But is it optimal for 8086 and 80286 computers2? Are there ways we could improve it further?
If we sketch out the total cost of the algorithm on 8086, it is approximately 16 cycles:
xor al, cl  ; +3 = 3
not al      ; +3 = 6
mov bl, al  ; +2 = 8
and al, dl  ; +3 = 11
shr al, 1   ; +2 = 13
and al, bl  ; +3 = 16
Here, CX is the Color value, and DX is the mask.
One excellent suggestion comes from @shachaf: we can use a binary equality to remove the NOT. Since
~(Pixels ^ Color) = Pixels ^ ~Colorand we can precompute color to be whatever we want, we might as well store “NotColor” instead:
char unsigned NotColor = ~Color;This allows us to remove the NOT in the actual algorithm:
char unsigned Eq = Pixels ^ NotColor;
char unsigned Result = Eq & ((Eq & Mask) >> 1);
Returning to the expected ASM, we save 3 cycles:
xor al, cl  ; +3 = 3
mov bl, al  ; +2 = 5
and al, dl  ; +3 = 8
shr al, 1   ; +2 = 10
and al, bl  ; +3 = 13
That may not seem like much, but considering the entire thing was only 16 cycles to begin with, 3 cycles is 18.75% of the total time!
Another option would be to use a lookup table, which probably wasn’t considered at the time due to the 256 byte cost of storing the table. 8086’s had an XLAT instruction, and my assumption would be that the fastest way to do a lookup table in this case would be to use that instruction. The entire algorithm would then just be one instruction, assuming you’d loaded the byte to test into AL as before:
xlat DetectionTable ; +11 = 11So, if somehow you could spare the 256 bytes, that would perhaps be a faster option than the 13-cycle binary version, assuming that the 11-cycle estimate from the 8086 manual holds up in actual use.
This is getting down to very few cycles, so, it does seem unlikely that it can be reduced further. But, never say never! If anyone else has any ideas, please put them in the comments, and if they work, I’ll add them to this addendum.
And no mention of bit-level puzzles would be complete without mentioning Hacker’s Delight, the ultimate compendium of such things. Every programmer should have this book on their desk!
Although the interview was in 1994, the interviewer was talking about work that was done in the past, probably before the 80386 existed.


Really neat little exercise! I briefly got confused in the video though. By choosing 3 or 0b11 as the example color value to test, we get the input again after the XOR and NOT. It took me a sec to realize that that only happens for 0b11.
I'm not working with binary every day and watched the video out-of-order because it is on YouTube, so I didn't immediately catch it. For binary beginners choosing a different test color might have helped, but I guess if you follow the course in order that should be basically no one. Great explanation though!
Since you can preprocess the color input, you can actually avoid the NOT by inverting the color bits first since ~(A XOR B) == A XOR ~B. So, if the color you want to check for is 0b01, you pass 0b10101010 to ContainsColor.